Przygotowanie instalacji na twardym dysku
Do codziennego użytku zalecamy stosowanie ext4. aptosid bardzo dobrze wspiera ten system plików i domyślnie proponuje jego użycie przy formatowaniu.
Przed instalacją usuń wszystkie zbędne urządzenia USB (pendrive, kamery itp.) . Instalacja systemu na urządzeniach USB wymaga dodatkowych kroków. Możesz edytować plik instalatora ~/.sidconf i dzięki temu skorzystać z innego systemu plików lub rozszerzyć swoją instalację na inne partycje (np. oddzielny /home ).
Posiadanie oddzielnej partycji z danymi jest wysoce zalecane. Przynosi to niemierzalne korzysci w postaci zwiększonej stabilności systemu, a także w przypadku odzyskiwania danych po awarii.
Twój katalog domowy ($HOME) jest miejscem, gdzie trzymane są pliki konfiguracyjne użytkownika, lub ujmując to inaczej, jest pojemnikiem dla aplikacji, w którym przechowywane są ustawienia.
Re-installing apps to rebuild or duplicate to another computer
To make a list of your installed applications so you can duplicate the installed base on another machine, or perhaps you are for some reason, reinstalling on your current PC, in a konsole
dpkg -l|awk '/^ii/{ print $2 }'|grep -v -e ^lib -e -dev -e $(uname -r) >/home/username/installed.txt
Następnie skopiuj utworzony plik tekstowy na pendrive lub inny nośnik danych.
On the new machine copy the text file to $HOME and use the list as a reference to install your required applications.
RAM a partycja swap
Na komputerach z mniej niż 512MB RAM musisz mieć partycję wymiany (swap). Wielkość nie powinna być mniejsza niż 128 mb (wskazania cfdisk nie są miarodajne, ponieważ oblicza on wielkość na bazie systemu dziesiętnego), więcej niż 1 GB dla partycji wymiany jest rzadko potrzebne.
Patrz: Partycjonowanie dysku twardego
ZAWSZE WYKONUJ KOPIĘ BEZPIECZEŃSTWA SWOICH DANYCH włączając w to zakładki i pocztę! See Back-Up with rdiff and Back-Up with rsync. Another option is sbackup (needs installing).
Instalacja na twardym dysku jest o wiele bardziej komfortowa i o wiele szybsza niż działanie systemu z CD.
Przede wszystkim musisz zmienić kolejność startu w ustawieniach BIOS, aby pierwszy był CD-ROM. W większości komputerów możesz wejść do konfiguracji BIOS poprzez naciśnięcie przycisku [del], gdy system startuje (w niektórych wersjach BIOS-u możesz po prostu wybrać urządzenie, z którego chcesz wystartować, np. w AMI-BIOS przy pomocy F11 lub F8).
aptosid powinien wystartować w większości przypadków. Jeśli tak się nie stanie, możesz skorzystać z opcji uruchamiania, które mogą zostać wykorzystane z programem rozruchowym. Użycie parametrów startu (np. do ustawienia rozdzielczości ekranu lub wyboru języka (jak: F4 aby wybrać język podczas rozruchu z live-cd) może zaoszczędzić wiele czasu późniejszej instalacji. Patrz: Opcje startowe i Opcje startowe dla VGA
(U)EFI booting
The bootloader will be an EFI program installed to /boot/efi/EFI/debian/grubx64.efi within your EFI system partition and mounted below /boot/efi/ on your installed system, provided the following conditions are met:
- The motherboard needs to have EFI firmware with EFI booting enabled.
- A current aptosid-amd64.iso
- Booted using UEFI and this is apparent from the plain white/blue grub2 menu, instead of the usual graphical boot menu provided by isolinux for BIOS booting, on the live medium.
- You have a GPT disk with an EFI System Partition (type EF00). This must be vfat or FAT formatted.
- The install target is not a USB disk. If you need to boot a USB stick see UEFI bootable removable devices.
UEFI bootable removable devices
In order to create a UEFI bootable device, such as a USB stick, the contents of the aptosid ISO can be extracted to a vfat formatted partition and the partition marked as bootable.
Optionally this removable medium can also be made compatible with PC-BIOS booting by installing a traditional boot sector in addition to the EFI boot loader (assuming /dev/sdz1 to be the target partition on the USB stick).
syslinux -i -d /boot/isolinux /dev/sdz1
install-mbr /dev/sdz
UEFI Secure Boot
aptosid does not currently support UEFI Secure Boot. The current intention is to wait to see how Debian will handle UEFI Secure Boot before deciding the best course of action for aptosid.
In order to allow dual/triple/quadruple booting of aptosid with other operating systems, UEFI Secure Boot needs to be disabled in the system firmware. The board firmware should offer a boot menu, although on some boards this may mean you need to boot into the MS OS Win 8 and cycle through various menus to turn off UEFI Secure Boot and then reboot.
Rod Smith of rodsbooks.com provides a good insight on the subject of Secure Boot: Managing EFI Boot Loaders for Linux: Dealing with Secure Boot.
Partitioning GPT and UEFI disks
For partitioning GPT and UEFI disks consult: Partitioning with gdisk for GPT disks.
Choosing the language for your installation
Language Installs with KDE-full
Select your main language from the grub menu (F4) in the kde-full release, to install the localisations for the desktop and many applications while booting.
This ensures they are also present after installing aptosid, while only installing the required languages for the given system. The amount of memory required for this feature depends on the language and aptosid may refuse to install the given language packs automatically with insufficient RAM and the boot sequence will be continued in English language but with the desired locales settings (currency, date and time format, keyboard charsets). 1 GB memory or more should be safe for all supported languages, which are:
Default - Deutsch (German)
Default - English(English-US)
*Čeština (Czech)
*Dansk (Danish)
*Español (Spanish)
*English (GB)
*Français (French)
*Italiano (Italian)
*Nihongo (Japanese)
*Nederlands (Dutch)
*Polski (Polish)
*Português (Portuguese BR and PT)
*Română (Romanian)
*Russian (Russian)
*Українська (Ukrainian)
The language selection depends on the availability of aptosid-manual translations, get involved to add your language.
Other Language installs with KDE-lite
- Select your main language from the gfxboot menu (F4). (See also aptosid specific Live-CD Cheatcodes). The Language files themselves are not on the Live-CD so the system will fall back to default English. However, this will make the correct language configuration needed for your preferred language and therefore no need to make any changes into the system, aside from the installation of the missing language files.
- Start the installation.
- Install to HD and reboot.
- After HD install, install the language of your choice and applications via apt-get.
First Time boot up to the HD
After booting up for the first time you will discover that aptosid has forgotten its network configuration. The network can be comfortably set up from Kmenu > Internet > Ceni. For additional WIFI/WLAN roaming please read this.
Instalator aptosid
1. Instalator można uruchomić z Desktop icon, the KMenu> System>aptosid-installer, lub via konsole:
su
install-gui.bash
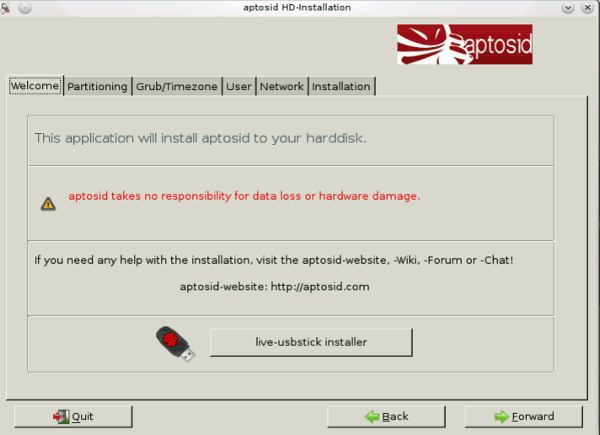
2. Po przeczytaniu (i zrozumieniu) ostrzeżenia przechodzimy do wyboru partycji.
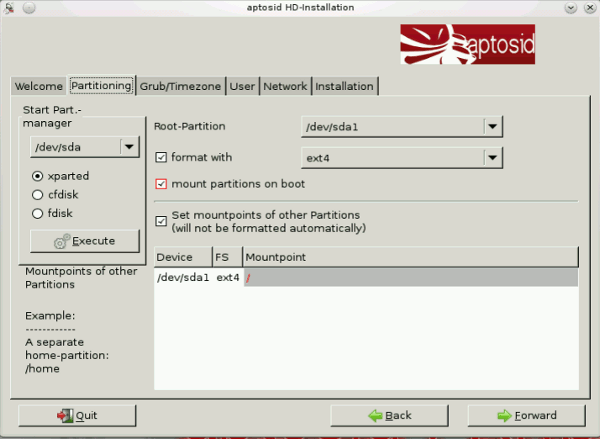
Now choose where the installation is supposed to go to and we establish the mount points. Partitions which you do not establish mount points for, will be auto mounted (the swap partition will always be automatically mounted, when the system starts).
NOTE: If you have your root partition ('/") formatted with your preferred file system, you can uncheck the "format with" checkbox, provided that the drop box reflects the file system of your choice.
Teraz wybieramy, gdzie instalować system, i ustawiamy punkty montowania. Partycje, dla których nie ustawimy punktów montowania, są montowane przez instalator. Musisz tu wybrać partycję główną ("/") dla instalacji siduksa. W tym momencie możesz również wybrać utworzenie partycji z danymi. A 'left-click' will activate your choices for each partition.
Czy dokonałeś kopii bezpieczeństwa swoich danych?
Jeśli jeszcze nie partycjonowałeś swojego twardego dysku, kliknij na przycisk start-part-manager, lub przejrzyj rozdział Partycjonowanie twardego dysku i Partycjonowanie twardego dysku przy pomocy Gparted Możesz również uruchomić też konsoli/terminala
su-to-root -X -c gparted
lub
su
cfdisk
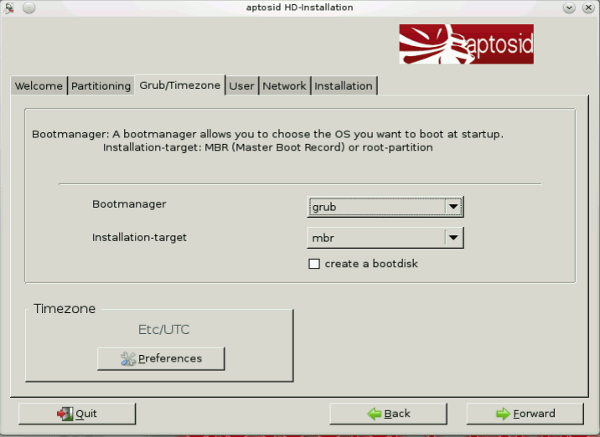
3. aptosid używa jako programu rozruchowego gruba, więc instaluj Gruba do MBR! Jeśli dokonasz tu innego wyboru, powinieneś wiedzieć, co robisz.
Grub rozpoznaje inne zainstalowane systemy operacyjne (np. Windows) i dodaje je do menu startowego.
Ponadto możesz w tym oknie zmienić strefę czasową.
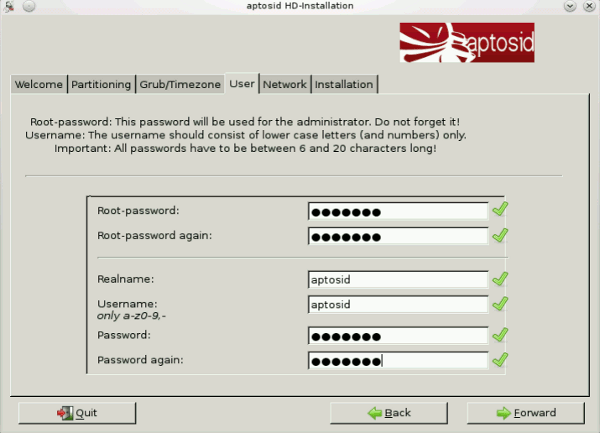
4. Dalej należy podać nazwę użytkownika i hasło oraz hasło roota (zapamiętaj je!). Nie wybieraj haseł, które łatwo odgadnąć. To add additional users, do so after installation via the terminal with adduser..
5. Teraz wybierz nazwę instalacji (możesz wybrać nazwę, jaką chcesz, biorąc pod uwagę, że 'Nazwa hosta: nazwa hosta powinna składać się z tylko liter (i cyfr) i nie może zaczynać się cyfrą'.
After that you can choose whether ssh shall start automatically or not.
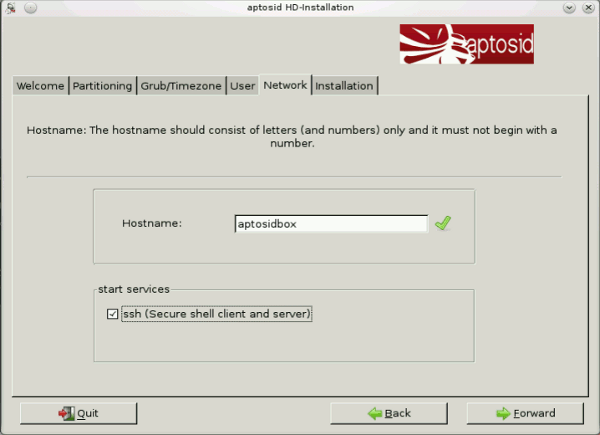
6. To pytanie jest ostatnią szansą, aby sprawdzić ustawienia instalacji. Preczytaj je dokładnie, a następnie kliknij Zapisz konfigurację i dalej.
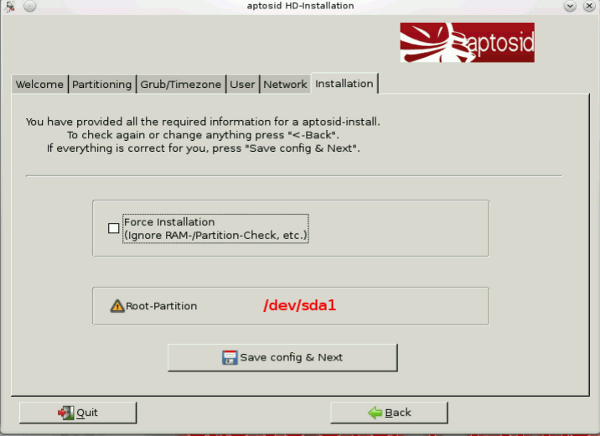
W tym miejscu jest możliwość zmiany/edycji pliku konfiguracyjnego a następnie uruchomienia procedury instalacyjnej przy zmienionej konfiguracji. Instalator nie wykonuje żadnych testów, a ty nie możesz kliknąć "w tył" w instalatorze, ponieważ zmiany dokonane manualnie zostaną utracone.
Edycja (~/.sidconf) jest przeznaczona dla doświadczonych użytkowników linuksa, którzy chcą zapisać swoje zmiany w pliku konfiguracyjnym lub wprowadzić specjalny schemat partycjonowania dysku, który zostałby odrzucony przez automatyczny test instalatora.
Should the installer detect that you are trying to install over an old $HOME it will warn you and will not let you proceed with the installation until you choose another user name.
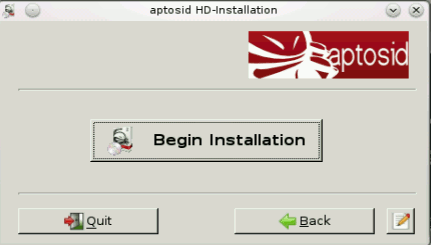
Aby rozpocząć instalację kliknij na Rozpocznij instalację Cały proces zajmuje, zależnie od twojego systemu, 5 - 15 minut, na starszych komputerach może to być nawet 60 minut.
Jeśli pasek postępu zatrzyma się w jednym miejscu na chwilę, nie przerywaj instalacji, po prostu daj mu trochę czasu.
Zakończone! Wyjmij CD z napędu. Teraz uruchom ponownie komputer z twojej nowej instalacji na twardym dysku.
Pierwsze uruchomienie systemu
Po pierwszym uruchomieniu odkryjesz, że aptosid "zapomniał" ustawienia sieciowe. Musisz więc ponownie je skonfigurować (Wlan, Modem, ISDN,...).
Jeśli wcześniej miałeś wykrywany adres sieciowy automatycznie (DHCP) przy użyciu DSL-Router, musisz uaktywnić to ponownie:
ceni
Odpowiednie narzędzia są nadal dostępne w Kmenu>Internet>ceni. Sprawdź również: Internet i sieć
To add an existing aptosid $home partition to new installation fstab needs to be altered, refer to Moving /home.
Do not use or share an existing $home from another distribution as the $home configuration files in a home directory will conflict if you share the same username between differing distributions.
To add users to your installation
To add a new user with automatic group permissions granted, as root:
adduser <newuser>
Just press enter, it should take care of the complexities You will get asked to type in the password twice
aptosid specific icons (like the manual and IRC icons) need adding manually.
To delete a user
deluser <user>
Read
man adduser
man deluser
kuser can create new user as well, however you will need to manually adjust the group permissions for that user.
O su-to-root -X -c <application>
Wiele poleceń wymaga uruchomienia z prawami roota. Aby to osiągnąć, wpisz:
su
Popularnym poleceniem, aby stać się rootem jest 'su' ale użycie su-to-root -X -c <application> pozwala dodatkowo uruchamiać aplikacje GUI / X11 z linii poleceń.
Refer to About Xapps whilst in X as root
Some KDE applications require dbus-launch in front of the application:
dbus-launch <Application>
Przykładem uruchomienia aplikacji X11 przez su-to-root -X -c jest użycie edytora tekstu jak kwrite lub kate, aby zmienić plik należący do roota, partycjonowanie przy pomocy gparted lub praca z menadżerem plików takiem jak konqueror. Możesz także zmieniać pliki należące do roota poprzez kliknięcie na nie prawym klawiszem myszy i wybranie 'edit-as-root', a następnie wpisanie hasła roota, co wywoła w tle kdesu.
W przeciwieństwie do 'sudo', oznacza to, że ktoś korzystając z hasła użytkownika, po wpisaniu 'sudo', nie może dokonać potencjalnie niebezpiecznych zmian w twoim systemie.
UWAGA: Kiedy jesteś zalogowany jako root, system nie powstrzyma cię do zrobienia potencjalnie niebezpiecznych rzeczy takich jak usuwanie ważnych plików itp., musisz absolutnie pewnym, co robisz, ponieważ jest bardzo prawdopodobne, że możesz poważnie uszkodzić swój system.
W żadnym wypadku nie powinieneś uruchamiać jako root aplikacji, które zwykły użytkownik wykorzystuje na codzień, takich jak klient poczty, arkusz kalkulacyjny, czy przeglądarka internetowa.

 Szukaj

